Build a Distributed RAG Pipeline from YSQL with pg_dist_rag

In Part 1 of this series, What Is RAG? From PostgreSQL pgrag to Distributed RAG with YugabyteDB pg_dist_rag, we looked at Retrieval-Augmented Generation (RAG), why vector search is only one piece of the problem, and how YugabyteDB’s pg_dist_rag extension takes a distributed approach to document preprocessing.

Now it is time to build one.

In this tip, we will take a small collection of documents stored in Amazon S3 and turn them into searchable vector embeddings using:

RAG-Pipeline2

The interesting part is how little application-specific pipeline code we need to write.

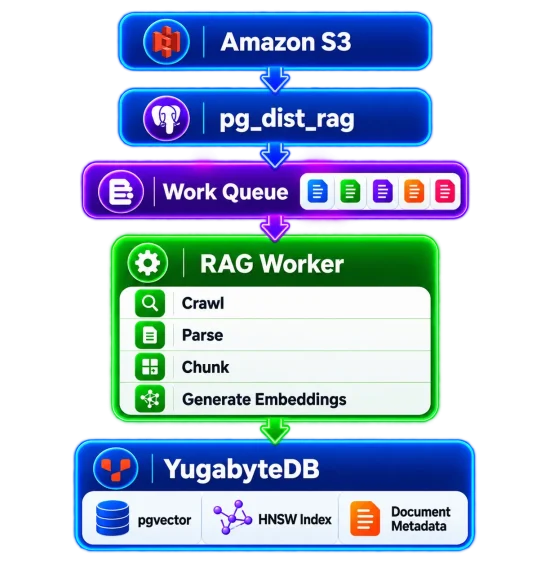
Much of the pipeline is defined and managed from YSQL using the functions provided by pg_dist_rag. The extension registers sources, manages pipeline state, queues work, tracks documents, creates the pgvector-backed table, and provides views for monitoring the pipeline. External Python workers then claim work from YugabyteDB and perform the compute-intensive parsing, chunking, and embedding operations.

What Does “from YSQL” Mean?

YSQL acts as the control plane for the RAG pipeline. The compute-intensive work does not run inside the database backend. External RAG workers crawl, parse, chunk, and embed documents, while YugabyteDB manages the work queue, pipeline state, metadata, and resulting vectors.
What We Are Going to Build

For this demo, we will create a tiny fictional operations knowledge base consisting of three Markdown documents:

				
					rag-demo/
|
+-- availability.md
+-- backups.md
+-- scaling.md


The content itself is intentionally simple. The goal of this tip is not to build an impressive AI application yet.

The goal is to watch the complete distributed preprocessing pipeline work.

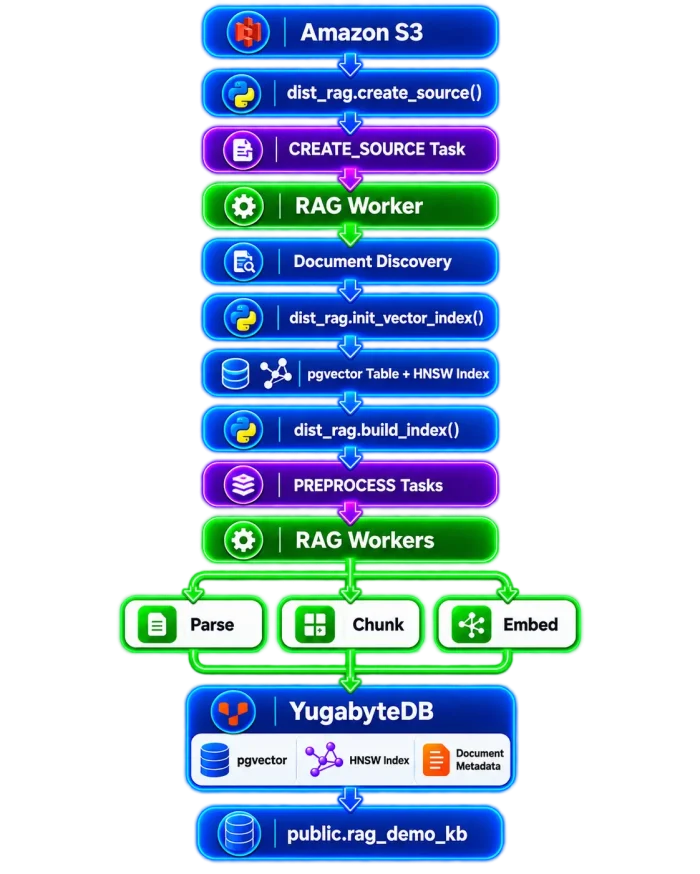
By the end of the demo, we will have:

S3 Documents
|
v
Registered Source
|
v
Discovered Documents
|
v
PREPROCESS Tasks
|
v
RAG Worker
|
v
Chunks + Embeddings
|
v
public.rag_demo_kb
|
v
HNSW Vector Index

Prerequisites

The dedicated pg_dist_rag setup documentation currently specifies YugabyteDB v2026.1.1 or later, Python 3.11, pgvector, an OpenAI API key, and AWS credentials when accessing a private S3 bucket. pg_dist_rag is currently a Tech Preview feature.

Requirement Purpose
YugabyteDB v2026.1.1+ Database containing the pg_dist_rag extension.
pgvector Stores embeddings and provides vector similarity search.
Python 3.11 Runs the external RAG worker.
OpenAI API Key Generates document embeddings.
Amazon S3 Stores the source documents for this demo.

The current implementation supports PDF, text, JSON, CSV, HTML, XML, and Markdown documents. The dedicated setup documentation currently specifies S3 as the supported source location and OpenAI as the supported embedding provider.

Tech Preview

pg_dist_rag is currently a YugabyteDB Tech Preview feature. Evaluate its current limitations and support status before considering it for production workloads.

Step 1: Create Some Demo Documents

We will use Markdown documents so that PDF/OCR dependencies are not required for this demo.

Create a directory:

				
					mkdir -p rag-demo
cd rag-demo


Create availability.md:

				
					cat > availability.md <<'EOF'
# Availability

The Acme Payments production service is deployed across three availability zones.

Database maintenance should be performed gradually so that the application remains available while individual infrastructure components are serviced.

Production changes must be validated before proceeding to the next stage.
EOF


Create backups.md:

				
					cat > backups.md <<'EOF'
# Backups

The Acme Payments platform creates scheduled backups of production data.

Backup jobs are monitored for successful completion and recovery procedures are tested regularly.

A backup should not be considered useful until the organization has verified that it can be restored.
EOF


Create scaling.md:

				
					cat > scaling.md <<'EOF'
# Scaling

The Acme Payments operations team monitors database utilization and application latency.

When sustained workload growth requires additional capacity, infrastructure can be expanded rather than waiting for resource exhaustion.

Scaling decisions should consider CPU utilization, storage growth, connection demand, and application latency.
EOF


Now upload them to an S3 bucket that the RAG worker can access:

				
					export RAG_BUCKET=<your-s3-bucket>

aws s3 sync ./ s3://${RAG_BUCKET}/rag-demo/


Verify:

				
					aws s3 ls s3://${RAG_BUCKET}/rag-demo/


You should see the three Markdown files.

Step 2: Enable the Extensions

Connect to YugabyteDB using ysqlsh.

Install vector first and then pg_dist_rag:

				
					CREATE EXTENSION IF NOT EXISTS vector;
CREATE EXTENSION IF NOT EXISTS pg_dist_rag;


This creates the dist_rag schema and the tables, types, functions, and views used to manage the distributed RAG pipeline.

Verify the extensions:

				
					SELECT
    extname,
    extversion
FROM pg_extension
WHERE extname IN ('vector', 'pg_dist_rag')
ORDER BY extname;


Take a look at what pg_dist_rag created:

				
					SELECT
    table_schema,
    table_name
FROM information_schema.tables
WHERE table_schema = 'dist_rag'
ORDER BY table_name;
				
			
Among the important tables are:
  • dist_rag.sources
  • dist_rag.vector_indexes
  • dist_rag.vector_index_source_mappings
  • dist_rag.documents
  • dist_rag.pipeline_details
  • dist_rag.work_queue

The work queue uses lease-based locking to coordinate tasks between workers.

Step 3: Start a RAG Worker

The RAG worker is included with the YugabyteDB installation.

On the machine that will run the worker:

				
					cd <yugabytedb-install-dir>/python/ai/rag_agent


Create a Python 3.11 virtual environment:

				
					uv venv --python=3.11
source .venv/bin/activate
uv pip install -r requirements.txt


Configure the worker:

				
					export YUGABYTEDB_CONNECTION_STRING="postgresql://yugabyte:<password>@<node-address>:5433/yugabyte"

export OPENAI_API_KEY="<your-openai-api-key>"

export AWS_REGION="us-east-1"
export AWS_ACCESS_KEY_ID="<key-id>"
export AWS_SECRET_ACCESS_KEY="<secret-key>"


Public S3 objects do not require the AWS access-key variables. The default worker type is TEXT, which handles the Markdown documents used in this demo. PDF processing can instead be handled by workers configured with WORKER_DOCUMENT_TYPE=PDF.

Start the worker:
				
					python __main__.py


The process remains running and polls:

  • dist_rag.work_queue

for work.

Keep Credentials with the Worker

The OpenAI API key and S3 credentials are configured on the RAG worker rather than embedded in the SQL used to build the pipeline. The worker uses those credentials when retrieving documents and generating embeddings.

Step 4: Register the S3 Source

Now return to ysqlsh.

Register the document location:

				
					SELECT dist_rag.create_source(
    r_source_uri := 's3://<your-s3-bucket>/rag-demo/',
    r_metadata := '{
        "demo": "rag_series",
        "content_type": "operations"
    }'::jsonb
) AS source_id \gset


Display the returned UUID:

				
					\echo :source_id


create_source() does more than insert a row into a catalog table.

It queues a:
  • CREATE_SOURCE

task in dist_rag.work_queue. The worker claims that task and crawls the S3 source to discover the documents.

Look at the queue:

				
					SELECT *
FROM dist_rag.work_queue;


Then examine the registered source:

				
					SELECT *
FROM dist_rag.sources;


And the discovered documents:

				
					SELECT *
FROM dist_rag.documents;


You should eventually see the three files from the S3 prefix represented in the document catalog.

The Queue May Move Quickly

With only a few small documents and an active worker, tasks may move through the work queue very quickly. If a task is already completed by the time you query the table, that is expected.

Step 5: Create the Vector Index

Now create the knowledge base:

				
					SELECT dist_rag.init_vector_index(
    r_index_name := 'rag_demo_kb',
    r_sources := ARRAY[:'source_id']::UUID[],
    r_ai_provider := 'OPENAI',
    r_embedding_model_params := '{
        "dimensions": 1536
    }'::jsonb
) AS index_id \gset


Display its ID:

				
					\echo :index_id


This is an important step.

init_vector_index() creates a real backing table… in this example:
  • public.rag_demo_kb

and creates an HNSW index on its embeddings column. The number supplied in dimensions determines the vector(N) dimension of that column. The default vector-index options use cosine distance with HNSW parameters m=16 and ef_construction=64.

Verify that the table exists:

				
					SELECT
    table_schema,
    table_name
FROM information_schema.tables
WHERE table_schema = 'public'
  AND table_name = 'rag_demo_kb';


And inspect the indexes created on it:

				
					SELECT
    indexname,
    indexdef
FROM pg_indexes
WHERE schemaname = 'public'
  AND tablename = 'rag_demo_kb';


This is worth emphasizing:

  • pg_dist_rag is not storing vectors in some hidden external vector service.

The resulting embeddings live in a YugabyteDB table backed by pgvector.

Step 6: Build the Index

So far we have:

  • ● Source registered
  • ● Vector index created

But we have not yet asked YugabyteDB to preprocess the documents.

Do that now:

				
					SELECT dist_rag.build_index(
    r_index_name := 'rag_demo_kb'
);


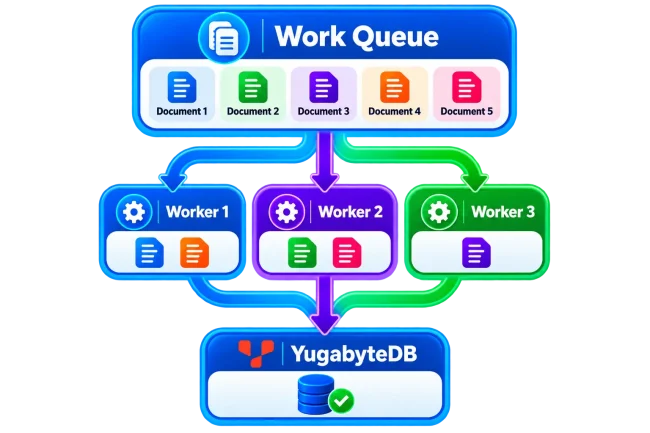
build_index() queues a PREPROCESS task for each document associated with the index. Workers claim those tasks and process different documents in parallel.

Conceptually:

dist_rag-work_queue

This is where the distributed nature of the preprocessing architecture becomes visible.

Step 7: Watch the Pipeline

One of the nicest parts of pg_dist_rag is that we do not have to parse worker logs to determine how far the pipeline has progressed.

Use:

				
					SELECT
    index_name,
    document_name,
    pipeline_status,
    chunks_processed,
    embeddings_persisted,
    current_step,
    last_error_message
FROM dist_rag.vector_index_pipeline_details
WHERE index_name = 'rag_demo_kb';


The view exposes per-document progress, including the current pipeline step, number of chunks processed, embeddings persisted, and the latest error if processing fails.

There is also an aggregated statistics view:

				
					SELECT
    index_name,
    document_name,
    calls,
    total_chunks_processed,
    total_embeddings_persisted,
    completion_rate_percent
FROM dist_rag.pipeline_stats
WHERE index_name = 'rag_demo_kb';


For our tiny example, all three documents should eventually reach:

				
					COMPLETED


Step 8: Look at What Was Actually Stored

Once preprocessing completes:

				
					SELECT count(*) AS chunks_stored
FROM public.rag_demo_kb;


Now inspect some of the chunks:

				
					SELECT
    id,
    document_id,
    tenant_id,
    LEFT(chunk_text, 120) AS chunk_preview,
    metadata_filters
FROM public.rag_demo_kb
ORDER BY id
LIMIT 10;


Each generated row can contain:

  • ● chunk_text
  • ● embeddings
  • ● document_id
  • ● tenant_id
  • ● metadata_filters

The presence of tenant_id and JSONB metadata_filters will become particularly important later in this series.

A Preview of Where This Series Is Going

Notice that the backing table already includes tenant_id and metadata_filters. Those columns allow vector similarity to be combined with normal relational filtering and provide the foundation for the multi-tenant examples later in this series.

Step 9: Verify Vector Similarity Search

A real RAG application’s query path normally takes a user’s question, generates an embedding for that question, and then uses the resulting vector in a pgvector similarity query.

That query conceptually looks like:

				
					SELECT
    chunk_text,
    embeddings <=> :query_embedding AS distance
FROM public.rag_demo_kb
ORDER BY distance
LIMIT 5;


For a simple database-only smoke test, we can use one of the existing embeddings as our query vector:

				
					WITH query_vector AS (
    SELECT embeddings
    FROM public.rag_demo_kb
    ORDER BY id
    LIMIT 1
)
SELECT
    d.id,
    LEFT(d.chunk_text, 120) AS chunk_preview,
    d.embeddings <=> q.embeddings AS distance
FROM public.rag_demo_kb AS d
CROSS JOIN query_vector AS q
ORDER BY distance
LIMIT 5;
				
			
The source row itself should have a distance of:
  • 0

with increasingly different chunks appearing farther away.

This Is a Pipeline Smoke Test

Using an existing stored embedding is useful for verifying that vector search works, but it is not the normal RAG query path. A real application generates an embedding from the user’s question and uses that vector to retrieve relevant chunks.

Step 10: Add More Workers

Our three-document demo hardly needs distributed processing.

But imagine 3 documents becoming 3,000,000 doucuments.

This is where the worker architecture matters.

Each worker claims a different document from dist_rag.work_queue. Adding workers therefore increases preprocessing parallelism without changing the database configuration. YugabyteDB’s current documentation also allows TEXT and PDF workers to be scaled independently.

For example:

YB-Work-Queue

Start another worker process on another suitable node using the same environment configuration:

				
					python __main__.py


No worker-count setting needs to be changed in YugabyteDB.

Workers simply compete for available tasks.

And if there is no ingestion work?

You can run zero workers. Queued work remains in YugabyteDB and resumes when workers become available.

What Did We Actually Build?

With a handful of SQL calls we created this:

Full-RAG-Pipeline

There is no custom application work queue.

No custom document-state table.

No custom pipeline-monitoring schema.

And no separate vector database.

The extension and workers coordinate the preprocessing pipeline while the resulting chunks, metadata, and vectors land directly in YugabyteDB.

The Four Functions to Remember

The basic workflow boils down to four functions.

Function Purpose
dist_rag.create_source() Register a document collection and queue source discovery.
dist_rag.init_vector_index() Create the pgvector-backed knowledge-base table and HNSW index.
dist_rag.add_source_to_index() Attach additional document sources to an existing vector index.
dist_rag.build_index() Queue document preprocessing, chunking, and embedding generation.

Final Takeaway

pgvector gives YugabyteDB the ability to store embeddings and perform vector similarity searches.

pg_dist_rag tackles a different problem:

  • How do those embeddings get there in the first place?

Instead of building a separate ETL framework to discover documents, track processing state, queue work, retry failures, generate embeddings, and monitor progress, pg_dist_rag makes YugabyteDB the control plane for the preprocessing pipeline.

External workers handle the computationally expensive operations.

YugabyteDB coordinates them.

And the finished vectors land directly in the same distributed SQL database that can also hold your application’s relational and transactional data.

That becomes especially interesting when multiple customers, institutions, or application tenants need to share that infrastructure.

Which is exactly where we are going next.

Up Next

We will take what we built here and make it much more interesting:

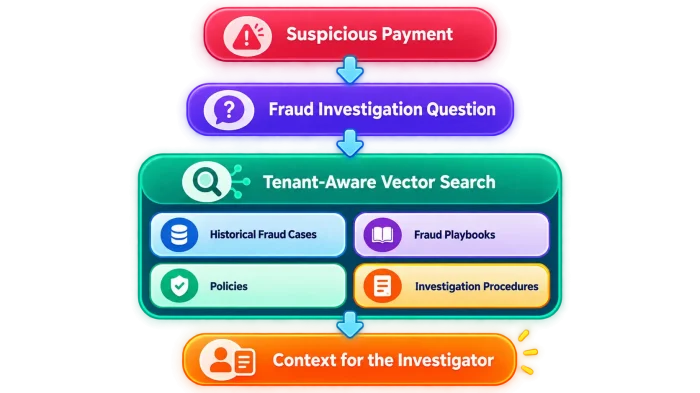
RAG-Fraud

And critically:

  • Bank A -> Bank A knowledge only
  • Bank B -> Bank B knowledge only
  • Bank C -> Bank C knowledge only

That will let us combine three things YugabyteDB is particularly well positioned to bring together:

  • distributed SQL + vector search + multi-tenant application data.

References

Have Fun!

While shopping at the local Walmart near my son’s new house to help fill his fridge with food, we saw THIS!

My heart almost exploded with joy. 😂 I thought Sixlets had been discontinued a few years ago, but there they were… in all their glorious, chocolatey goodness! I absolutely LOVE this candy. And see that empty hook there in the middle?

Yeah… that was occupied by the six bags of Sixlets that are now sitting in our shopping cart. 😂

Some people get excited about finding rare collectibles. Apparently, I get excited about finding Sixlets at Walmart. 😄🍫🛒