WSL, or Windows Subsystem for Linux, offers Windows users the ability to operate a Linux environment directly within their Windows system. By eliminating the necessity for separate virtual machines or dual boot setups, WSL streamlines the experience of utilizing both Windows and Linux simultaneously. It’s tailored to empower developers, ensuring a smooth and efficient workflow across both operating systems.
It’s super easy to install YugbayteDB on WSL!
Step 1: Install Linux on Windows with WSL
The instructions for enabling WSL on Windows 11 can be found here: How to install Linux on Windows with WSL
NOTE: The default operating system that is installed, as of the creation of this YugabyteDB tip, is Ubuntu-24.04. This version of Ubuntu is not yet supported by YugabyteDB, so we need to install a version that is listed on the YugabyteDB Operating System Support doc page.
For my example, I want to use YugabyteDB 2.21.0.1, so I decided to install Ubuntu-20.04.
					C:\Users\GamersDreamMachine>wsl --install -d Ubuntu-20.04
Installing: Ubuntu 20.04 LTS
Ubuntu 20.04 LTS has been installed.
Launching Ubuntu 20.04 LTS...
Installing, this may take a few minutes...
Please create a default UNIX user account. The username does not need to match your Windows username.
For more information visit: https://aka.ms/wslusers
Enter new UNIX username: yugabyte
New password:
Retype new password:
passwd: password updated successfully
Installation successful!
To run a command as administrator (user "root"), use "sudo <command>".
See "man sudo_root" for details.

Welcome to Ubuntu 20.04.6 LTS (GNU/Linux 5.15.146.1-microsoft-standard-WSL2 x86_64)

 * Documentation:  https://help.ubuntu.com
 * Management:     https://landscape.canonical.com
 * Support:        https://ubuntu.com/advantage

  System information as of Sun May 19 16:39:28 EDT 2024

  System load:  0.59                Processes:             110
  Usage of /:   0.1% of 1006.85GB   Users logged in:       0
  Memory usage: 2%                  IPv4 address for eth0: 172.21.25.148
  Swap usage:   0%


Expanded Security Maintenance for Applications is not enabled.

0 updates can be applied immediately.

Enable ESM Apps to receive additional future security updates.
See https://ubuntu.com/esm or run: sudo pro status


The list of available updates is more than a week old.
To check for new updates run: sudo apt update


This message is shown once a day. To disable it please create the
/home/yugabyte/.hushlogin file.


yugabyte@GamersDreamMachine:~$
Step 2: Download and install YugabyteDB
You’ll want to follow the instructions on the YugabyteDB Quick Start for Linux doc page.
For my example, the only task I had to do before installing YugabyteDB was to fix python per the doc note: Starting from Ubuntu 20.04, python is no longer available. To fix this, run sudo apt install python-is-python3.
					yugabyte@GamersDreamMachine:~$ sudo apt install python-is-python3
[sudo] password for yugabyte:
Reading package lists... Done
Building dependency tree
Reading state information... Done
The following NEW packages will be installed:
  python-is-python3
0 upgraded, 1 newly installed, 0 to remove and 0 not upgraded.
Need to get 2364 B of archives.
After this operation, 10.2 kB of additional disk space will be used.
Get:1 http://archive.ubuntu.com/ubuntu focal/main amd64 python-is-python3 all 3.8.2-4 [2364 B]
Fetched 2364 B in 0s (17.3 kB/s)
Selecting previously unselected package python-is-python3.
(Reading database ... 32701 files and directories currently installed.)
Preparing to unpack .../python-is-python3_3.8.2-4_all.deb ...
Unpacking python-is-python3 (3.8.2-4) ...
Setting up python-is-python3 (3.8.2-4) ...

yugabyte@GamersDreamMachine:~$ which python
/usr/bin/python
Next I downloaded YugabyteDB and installed it.
					yugabyte@GamersDreamMachine:~$ wget https://downloads.yugabyte.com/releases/2.21.0.1/yugabyte-2.21.0.1-b1-linux-x86_64.tar.gz
--2024-05-19 11:48:33--  https://downloads.yugabyte.com/releases/2.21.0.1/yugabyte-2.21.0.1-b1-linux-x86_64.tar.gz
Resolving downloads.yugabyte.com (downloads.yugabyte.com)... 172.66.42.235, 172.66.41.21, 2606:4700:3108::ac42:2915, ...
Connecting to downloads.yugabyte.com (downloads.yugabyte.com)|172.66.42.235|:443... connected.
HTTP request sent, awaiting response... 200 OK
Length: 379523913 (362M) [application/x-tar]
Saving to: ‘yugabyte-2.21.0.1-b1-linux-x86_64.tar.gz’

yugabyte-2.21.0.1-b1-linux-x 100%[===========================================>] 361.94M  55.5MB/s    in 10s

2024-05-19 11:48:44 (35.2 MB/s) - ‘yugabyte-2.21.0.1-b1-linux-x86_64.tar.gz’ saved [379523913/379523913]
					yugabyte@GamersDreamMachine:~$ tar xvzf yugabyte-2.21.0.1-b1-linux-x86_64.tar.gz
yugabyte-2.21.0.1/
yugabyte-2.21.0.1/bin/
yugabyte-2.21.0.1/bin/ysqlsh
...
yugabyte-2.21.0.1/www/logo.png
yugabyte-2.21.0.1/www/yb.css
yugabyte-2.21.0.1/version_metadata.json
					yugabyte@GamersDreamMachine:~/yugabyte-2.21.0.1/bin$ ./post_install.sh
OpenSSL binary: ./../bin/../bin/openssl
FIPS module: ./../bin/../lib/ossl-modules/fips.so
HMAC : (Module_Integrity) : Pass
SHA1 : (KAT_Digest) : Pass
SHA2 : (KAT_Digest) : Pass
SHA3 : (KAT_Digest) : Pass
TDES : (KAT_Cipher) : Pass
AES_GCM : (KAT_Cipher) : Pass
AES_ECB_Decrypt : (KAT_Cipher) : Pass
RSA : (KAT_Signature) : RNG : (Continuous_RNG_Test) : Pass
Pass
ECDSA : (PCT_Signature) : Pass
ECDSA : (PCT_Signature) : Pass
DSA : (PCT_Signature) : Pass
TLS13_KDF_EXTRACT : (KAT_KDF) : Pass
TLS13_KDF_EXPAND : (KAT_KDF) : Pass
TLS12_PRF : (KAT_KDF) : Pass
PBKDF2 : (KAT_KDF) : Pass
SSHKDF : (KAT_KDF) : Pass
KBKDF : (KAT_KDF) : Pass
HKDF : (KAT_KDF) : Pass
SSKDF : (KAT_KDF) : Pass
X963KDF : (KAT_KDF) : Pass
X942KDF : (KAT_KDF) : Pass
HASH : (DRBG) : Pass
CTR : (DRBG) : Pass
HMAC : (DRBG) : Pass
DH : (KAT_KA) : Pass
ECDH : (KAT_KA) : Pass
RSA_Encrypt : (KAT_AsymmetricCipher) : Pass
RSA_Decrypt : (KAT_AsymmetricCipher) : Pass
RSA_Decrypt : (KAT_AsymmetricCipher) : Pass
INSTALL PASSED
Step 3: Start YugabyteDB using yugabyted.
					yugabyte@GamersDreamMachine:~/yugabyte-2.21.0.1/bin$ ./yugabyted start --advertise_address=$(hostname -I) --base_dir=~/y
b01
Starting yugabyted...
✅ YugabyteDB Started
✅ UI ready
✅ Data placement constraint successfully verified

⚠ WARNINGS:
- ntp/chrony package is missing for clock synchronization. For centos 7, we recommend installing either ntp or chrony package and for centos 8, we recommend installing chrony package.
- Cluster started in an insecure mode without authentication and encryption enabled. For non-production use only, not to be used without firewalls blocking the internet traffic.

Please review the following docs and rerun the start command:
- Quick start for Linux: https://docs.yugabyte.com/preview/quick-start/linux/

+------------------------------------------------------------------------------------------------------------+
|                                                 yugabyted                                                  |
+------------------------------------------------------------------------------------------------------------+
| Status              : Running.                                                                             |
| Replication Factor  : 1                                                                                    |
| YugabyteDB UI       : http://172.21.25.148:15433                                                           |
| JDBC                : jdbc:postgresql://172.21.25.148:5433/yugabyte?user=yugabyte&password=yugabyte        |
| YSQL                : bin/ysqlsh -h 172.21.25.148  -U yugabyte -d yugabyte                                 |
| YCQL                : bin/ycqlsh 172.21.25.148 9042 -u cassandra                                           |
| Data Dir            : /home/yugabyte/yb01/data                                                             |
| Log Dir             : /home/yugabyte/yb01/logs                                                             |
| Universe UUID       : abd23aa0-20a4-4271-9bdf-7eb564d7f7cb                                                 |
+------------------------------------------------------------------------------------------------------------+
🚀 YugabyteDB started successfully! To load a sample dataset, try 'yugabyted demo'.
🎉 Join us on Slack at https://www.yugabyte.com/slack
👕 Claim your free t-shirt at https://www.yugabyte.com/community-rewards/
Step 4: Connect to YugabyteDB
					yugabyte@GamersDreamMachine:~/yugabyte-2.21.0.1/bin$ ./ysqlsh -h 172.21.25.148
ysqlsh (11.2-YB-2.21.0.1-b0)
Type "help" for help.

No entry for terminal type "xterm-256color";
using dumb terminal settings.
yugabyte=# SELECT substring(version() from 'YB-([^\s]+)') AS "YugabyteDB Version";
 YugabyteDB Version
--------------------
 2.21.0.1-b0
(1 row)
You should also be able to connect to your YugabyteDB install from tools on your Windows Desktop!
Examples:
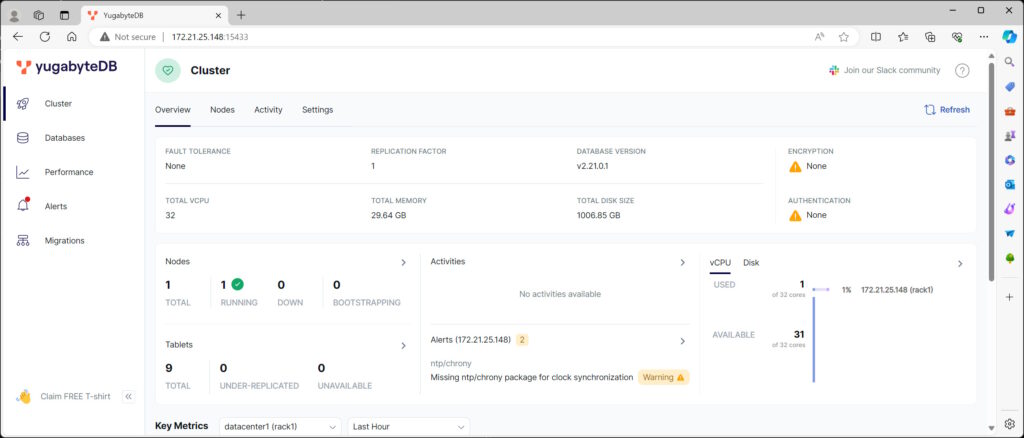
The yugabyted webserver UI from the MS Edge web browser:
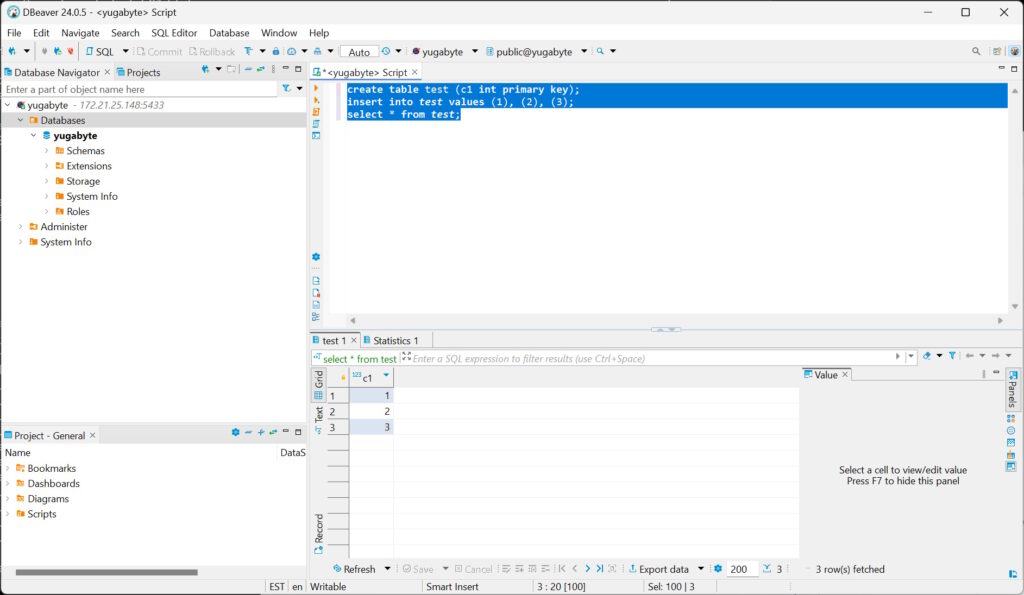
Using DBeaver, the free and open source universal database tool for developers and database administrators.
Have Fun!