Connect YugabyteDB Docs AI to Your AI Assistant with MCP

If you’ve used Ask AI on the YugabyteDB documentation site, you’ve already seen YugabyteDB Docs AI in action.

But you don’t have to stay in the browser to use it.

The Use MCP option lets you bring that same YugabyteDB knowledge directly into tools like Claude Code, Codex, Cursor, VS Code, and ChatGPT using the Model Context Protocol (MCP). The hosted endpoint is:

				
					https://yugabyte.mcp.kapa.ai


The first time you connect, YugabyteDB’s documentation says you’ll be prompted to authenticate through a Google sign-in flow.

💡 One YugabyteDB Docs AI – Many AI Clients
Instead of switching back and forth between your AI assistant and the YugabyteDB documentation, connect the Docs AI directly to the tool where you’re already working.
https://yugabyte.mcp.kapa.ai

What Does the Docs MCP Server Actually Do?

The YugabyteDB Docs MCP Server gives an AI assistant access to current YugabyteDB product knowledge at runtime.

That means your assistant can search YugabyteDB documentation and related knowledge sources while it is answering your question instead of depending only on information that may have been present when the model was trained. The official YugabyteDB MCP documentation specifically calls out API and CLI references, blogs, and support articles as part of the searchable knowledge.

Conceptually:

Your AI Assistant
↓
Model Context Protocol (MCP)
↓
YugabyteDB Docs AI
↓
Current YugabyteDB Knowledge

Don’t Confuse the Two YugabyteDB MCP Servers

There are now two very different YugabyteDB MCP use cases, so this distinction is worth making.

📚 YugabyteDB Docs MCP Server
Connects your AI assistant to YugabyteDB product knowledge.
Use it for documentation, configuration, architecture, troubleshooting, releases, examples, and other YugabyteDB questions.
🗄️ YugabyteDB MCP Server
Connects your AI assistant to an actual YugabyteDB database.
Use it to inspect schemas, query data, analyze results, and optionally perform guarded write operations.

The regular YugabyteDB MCP Server exposes database-oriented tools such as summarize_database, run_read_only_query, and an optional guarded run_write_query. The Docs MCP Server is the knowledge/retrieval side of the story.

Connect Your Favorite Tool

The YugabyteDB documentation site makes this easy from Ask AI → Use MCP.

Claude Code

				
					claude mcp add --transport http yugabyte-docs https://yugabyte.mcp.kapa.ai


Then verify:

				
					claude mcp list


These are the commands documented by YugabyteDB.

Codex

				
					codex mcp add yugabyte-docs --url https://yugabyte.mcp.kapa.ai


Then:

				
					codex mcp list


That follows Codex’s standard remote-MCP syntax.

Cursor

From YugabyteDB Docs AI:

Ask AI
↓
Use MCP
↓
Add to Cursor

Cursor opens its MCP settings, where you install and connect the yugabyte-docs server.

VS Code

From the YugabyteDB Docs AI page, click Use MCP in the upper-right corner. In the Connect to AI Tools menu that opens, select Add to VS Code.

YugabyteDB’s current instructions require VS Code 1.102 or later with GitHub Copilot enabled. After adding the MCP server, open Copilot in Agent mode and make sure yugabyte-docs is enabled in the available tools.

YugabyteDB Docs AI
↓
Click Use MCP
↓
Add to VS Code

What About ChatGPT?

Yes… ChatGPT and Codex are separate OpenAI products, and both can work with MCP servers.

The YugabyteDB documentation explicitly lists ChatGPT as an MCP-compatible client and says clients that accept an MCP URL can use the hosted endpoint directly.

In ChatGPT environments where custom MCP servers are enabled, add a custom MCP server/plugin and use:

Name
YugabyteDB Docs
Server URL
https://yugabyte.mcp.kapa.ai

Then complete the authentication flow.

OpenAI’s current flow for a remote server is ChatGPT Plugins → + → Create custom MCP server, then supply the server URL. Custom MCP availability and administration can depend on your ChatGPT plan and workspace configuration, and the feature continues to evolve.

⚠️ ChatGPT MCP Availability
ChatGPT’s custom MCP/plugin support is still evolving, so the exact UI and permissions can vary by plan and workspace.
If you don’t see an option to create or connect a custom MCP server, your account or workspace may not currently have that capability enabled.

Demo: Connect YugabyteDB Docs AI to Codex

For this demo, I used the Codex CLI on my MacBook. You can follow the same general process on whatever supported environment you use for Codex.

1. Install the Codex CLI

If the Codex CLI is not already installed, install it using the method appropriate for your environment.

For my MacBook, I used the official standalone installer:

				
					curl -fsSL https://chatgpt.com/codex/install.sh | sh
				
			
2. Reload Your Shell Profile

After installation, reload your shell environment so the newly installed codex command is available.

On my MacBook, I ran:

				
					source ~/.zprofile


You can then verify the installation with:

				
					codex --version
				
			
3. Register the YugabyteDB Docs MCP Server

Add the hosted YugabyteDB documentation MCP server to Codex:

				
					codex mcp add yugabyte-docs --url https://yugabyte.mcp.kapa.ai
				
			
4. Authenticate to the MCP Server

Start the authentication flow:

				
					codex mcp login yugabyte-docs --scopes openid


Your browser should open so you can authenticate.

If the normal login flow completes successfully, you’re done with this step.

If the browser reaches the login page but the authentication flow does not correctly identify the YugabyteDB MCP resource, append the following to the end of the URL in the browser address bar:

				
					&resource=https%3A%2F%2Fyugabyte.mcp.kapa.ai%2F


Press Enter, then complete the sign-in.

⚠️ Authentication Workaround
Try the normal Codex authentication flow first.
If the login page does not correctly identify the YugabyteDB Docs MCP resource, append &resource=https%3A%2F%2Fyugabyte.mcp.kapa.ai%2F to the browser URL and continue the sign-in.
5. Confirm the Connection

Start Codex:

				
					codex


At the Codex prompt, enter:

				
					/mcp


Confirm that yugabyte-docs appears and is connected.

At this point, Codex can call the YugabyteDB Docs AI through MCP.

6. Run a YugabyteDB Question

Now ask Codex a question that benefits from current YugabyteDB documentation:

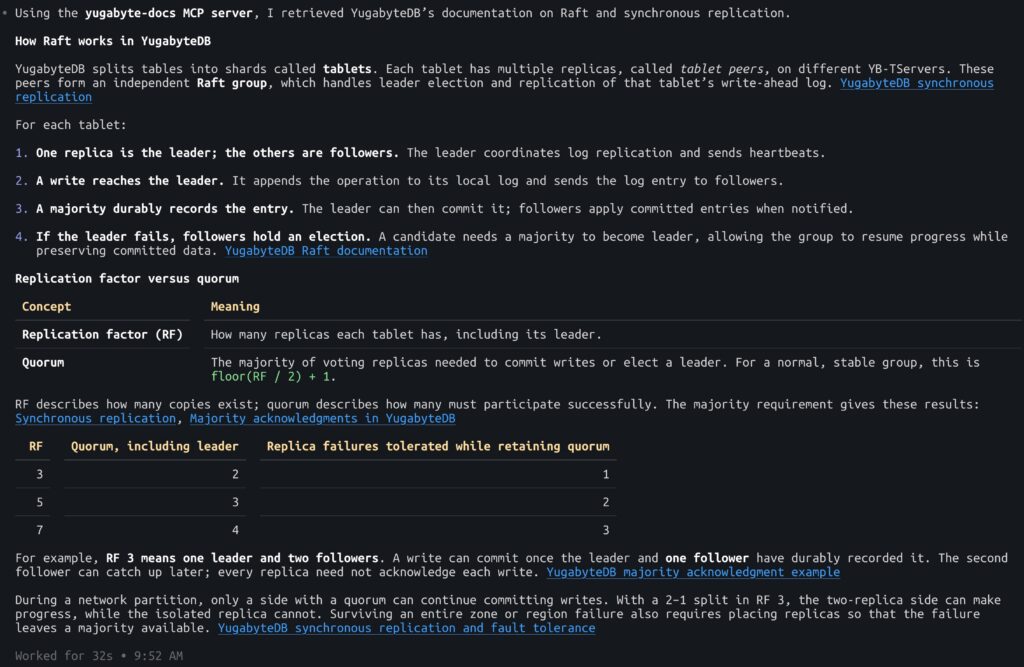
  • Use the yugabyte-docs MCP server to explain how Raft consensus works in YugabyteDB. Explain the difference between replication factor and quorum, and cite the YugabyteDB sources you use.

Conceptually, the flow now looks like this:

Ask Codex a YugabyteDB Question
↓
Codex Calls yugabyte-docs
↓
Docs AI Searches YugabyteDB Knowledge
↓
Answer Grounded in YugabyteDB Sources

In my Codex I saw these results:

What Knowledge Is Behind YugabyteDB Docs AI?

This is another part I find pretty interesting.

YugabyteDB Docs AI is powered by Kapa, an ingestion and retrieval platform for AI agents. Kapa connects to sources such as documentation sites, GitHub repositories, support content, PDFs, community discussions, and other knowledge stores, keeps that content synchronized, and makes it searchable by AI assistants through MCP or an API.

In other words, Kapa is the layer that helps the YugabyteDB Docs AI find relevant, current YugabyteDB information when an agent asks a question.

💡 What Is Kapa?
Kapa is the knowledge ingestion and retrieval layer behind YugabyteDB Docs AI.
It keeps multiple YugabyteDB knowledge sources indexed and searchable, then exposes that knowledge to AI assistants through MCP.

Kapa doesn’t have to index only one documentation site. It can combine multiple knowledge sources into the retrieval layer it exposes through MCP. Kapa describes its hosted MCP as a way of grounding agents in synchronized product documentation and other connected knowledge.

And yugabytedb.tips is one of the sources indexed in the YugabyteDB Kapa knowledge base.

In a recent one-month source-analytics snapshot, these were some of the most frequently referenced sources:

Knowledge Source References
docs.yugabyte.com 6,707
github.com 3,397
support.yugabyte.com 787
www.yugabyte.com 706
yugabytedb.tips 588

Those numbers are only a snapshot and will naturally change over time, but they illustrate something important: the answer engine can draw from multiple YugabyteDB knowledge sources rather than treating a single documentation page as its entire universe.

And, of course, I was happy to see yugabytedb.tips showing up there!

😎 Yes, YugabyteDB.Tips Is in There Too!
YugabyteDB.Tips is indexed as one of the knowledge sources available to YugabyteDB’s Kapa-powered Docs AI.
So when one of these Tips contains useful context for a question, the Docs AI can retrieve it alongside documentation, GitHub, support content, and other YugabyteDB resources.

Why I Like This

Searching documentation isn’t difficult.

The useful part here is removing the context switch.

Instead of:

Ask AI a YugabyteDB Question
↓
AI Is Unsure
↓
Open Browser
↓
Search YugabyteDB Docs
↓
Copy Context Back to the Agent

you get:

Ask a YugabyteDB Question
↓
Agent Searches Docs AI Through MCP
↓
Continue Working

Final Takeaway

MCP makes the YugabyteDB Docs AI much more useful than a chatbot embedded in a documentation page.

It lets you take the same YugabyteDB knowledge and bring it directly into the AI assistant or coding environment where you’re already working.

💡 The Big Idea
Don’t make your AI assistant guess about YugabyteDB when it can ask the YugabyteDB Docs AI.
Connect the hosted MCP server once, and tools such as Claude Code, Codex, Cursor, VS Code, and supported ChatGPT environments can retrieve current YugabyteDB knowledge while you work.
One endpoint. Multiple AI tools. Current YugabyteDB context when the agent actually needs it.
⚠️ Still Validate Important Answers
The YugabyteDB Docs MCP server helps ground responses in current YugabyteDB knowledge, but the final answer is still generated by an LLM.
For important technical decisions, production changes, or troubleshooting steps, review the cited YugabyteDB documentation and source material before acting.

Have Fun!

While in NYC last week for the Postgres Summit, I stayed near Little Italy and discovered a Christmas store just down the street from my hotel. 🎄 I fell in love with this Peanuts display of the whole gang decorating a Christmas tree… until I saw the price tag! 😂

The good news? I found it on the official Jim Shore website for much less. Suddenly, I’m feeling the love again! ❤️