Create Multiple Colocation Groups in One YugabyteDB Database with Tablespaces

YugabyteDB colocation is a great fit for applications that contain many small tables and indexes. Instead of creating a separate tablet for every relation, multiple related tables and indexes can share a single parent tablet called a colocation tablet.

This reduces per-tablet overhead and can improve the performance of queries that join related tables because the data is stored together. The data in the colocation tablet remains replicated according to the configured replication factor.

But what happens when a database contains hundreds of small tables?

Placing every small table into one database-wide colocation tablet can eventually create a bottleneck. Although the tablet may have multiple replicas, it still has one active leader. By default, normal reads and writes are routed through that leader.

For example, consider a three-node RF3 universe containing:

  • ● Approximately 300 tables in one database.
  • ● Approximately 250 small tables that benefit from colocation.
  • ● Approximately 50 large tables created with COLOCATION = false.
  • ● Three logical application areas with mostly independent workloads.

Instead of placing all 250 small tables into a single colocation tablet, it may be preferable to divide them into three independent colocation groups.

In YugabyteDB 2025.2, this can be accomplished by combining a colocated database with multiple tablespaces.

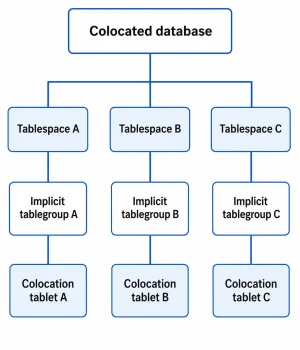
Key idea: When tablespace support for colocated tables is enabled, YugabyteDB creates an implicit tablegroup based on the tablespace assigned to the relation. Colocated tables and indexes assigned to the same tablespace share one colocation tablet. Relations assigned to another tablespace use a different colocation tablet.

Why Multiple Colocation Groups?

Creating multiple colocation groups provides a middle ground between these two extremes:

  • ● Placing every small table into one database-wide tablet.
  • ● Giving every table and index its own distributed tablets.

Each tablespace-backed group still benefits from colocation, but each group has its own tablet and tablet leader.

In a three-node universe, leader preferences can be used to encourage the three colocation tablet leaders to reside on different nodes.

Design Tablet Behavior Typical Use
Database-level colocation only All colocated relations share one tablet Small databases with modest throughput
Colocation with multiple tablespaces Each tablespace receives a separate colocation tablet Independent groups of small, related tables
Non-colocated tables Tables receive their own distributed tablets Large, hot, or independently scalable tables

What About the Deprecated TABLEGROUP Feature?

Earlier YugabyteDB implementations allowed users to create explicit tablegroups:

				
					CREATE TABLEGROUP application_group;


The TABLEGROUP feature has been deprecated and is expected to be removed in a future release. YugabyteDB emits a warning when explicit tablegroups are created under the newer colocation implementation.

The practical replacement pattern is:

  • 1. Create a database with COLOCATION = true.
  • 2. Enable colocated tables with tablespaces.
  • 3. Create a tablespace for each logical group.
  • 4. Assign the related tables and indexes to that tablespace.

YugabyteDB still uses tablegroups internally. The difference is that you no longer create and manage them directly. YugabyteDB creates an implicit tablegroup for each tablespace used by colocated relations.

The resulting structure looks like this:

CoolcatedDBArch

The implicit tablegroups remain visible through pg_yb_tablegroup.

Demo Environment

This demonstration assumes a three-node YugabyteDB universe with a replication factor of three.

Each node is in a different availability zone:

Node Cloud Region Zone
Node 1 cloud1 region1 zone1
Node 2 cloud1 region1 zone2
Node 3 cloud1 region1 zone3

We will create three tablespaces:

  • customer_group_ts
  • workflow_group_ts
  • reference_group_ts

Each tablespace will use RF3 and place one replica in each zone. The only difference will be the preferred location of the tablet leader.

Before running the demo: Replace cloud1, region1, and the zone names with the actual cloud, region, and zone labels used by your YugabyteDB universe.
Step 1: Enable Colocated Tables with Tablespaces

Set the following GFlag to true on every YB-Master and YB-TServer:

				
					ysql_enable_colocated_tables_with_tablespaces=true


A restart is required after changing this flag.

When enabled, a colocated relation created in a tablespace is placed into an implicit tablegroup determined by that tablespace. The flag is disabled by default.

For YugabyteDB Anywhere, add the GFlag to both process types:

				
					YB-Master:
ysql_enable_colocated_tables_with_tablespaces=true

YB-TServer:
ysql_enable_colocated_tables_with_tablespaces=true


Perform the required rolling restart after applying the configuration.

For a yugabyted deployment, include the flag for both processes when starting the nodes:

				
					./bin/yugabyted start \
  --master_flags="ysql_enable_colocated_tables_with_tablespaces=true" \
  --tserver_flags="ysql_enable_colocated_tables_with_tablespaces=true" \
  <additional_options>
				
			
Important: The flag must be enabled consistently on both the YB-Master and YB-TServer processes. Creating the database with COLOCATION = true by itself does not enable tablespace-backed colocation groups.
Step 2: Create a Colocated Database

Connect to an existing database, such as yugabyte, and create the demonstration database:

				
					CREATE DATABASE application_db
WITH COLOCATION = true;


Connect to the new database:

				
					\c application_db


Verify that the database is colocated:

				
					SELECT yb_is_database_colocated();


Expected result:

				
					.yb_is_database_colocated
--------------------------
 t
(1 row)


Tables created in a colocated database are colocated by default. Individual tables can opt out by using WITH (COLOCATION = false).

Step 3: Create the First Tablespace

The first tablespace uses RF3 and prefers its tablet leader in zone1.

				
					CREATE TABLESPACE customer_group_ts
WITH (
    replica_placement = '{
        "num_replicas": 3,
        "placement_blocks": [
            {
                "cloud": "cloud1",
                "region": "region1",
                "zone": "zone1",
                "min_num_replicas": 1,
                "leader_preference": 1
            },
            {
                "cloud": "cloud1",
                "region": "region1",
                "zone": "zone2",
                "min_num_replicas": 1,
                "leader_preference": 2
            },
            {
                "cloud": "cloud1",
                "region": "region1",
                "zone": "zone3",
                "min_num_replicas": 1,
                "leader_preference": 3
            }
        ]
    }'
);
				
			
Step 4: Create the Second Tablespace

The second tablespace prefers its tablet leader in zone2.

				
					CREATE TABLESPACE workflow_group_ts
WITH (
    replica_placement = '{
        "num_replicas": 3,
        "placement_blocks": [
            {
                "cloud": "cloud1",
                "region": "region1",
                "zone": "zone1",
                "min_num_replicas": 1,
                "leader_preference": 2
            },
            {
                "cloud": "cloud1",
                "region": "region1",
                "zone": "zone2",
                "min_num_replicas": 1,
                "leader_preference": 1
            },
            {
                "cloud": "cloud1",
                "region": "region1",
                "zone": "zone3",
                "min_num_replicas": 1,
                "leader_preference": 3
            }
        ]
    }'
);

				
			
Step 5: Create the Third Tablespace

The third tablespace prefers its tablet leader in zone3.

				
					CREATE TABLESPACE reference_group_ts
WITH (
    replica_placement = '{
        "num_replicas": 3,
        "placement_blocks": [
            {
                "cloud": "cloud1",
                "region": "region1",
                "zone": "zone1",
                "min_num_replicas": 1,
                "leader_preference": 2
            },
            {
                "cloud": "cloud1",
                "region": "region1",
                "zone": "zone2",
                "min_num_replicas": 1,
                "leader_preference": 3
            },
            {
                "cloud": "cloud1",
                "region": "region1",
                "zone": "zone3",
                "min_num_replicas": 1,
                "leader_preference": 1
            }
        ]
    }'
);


A leader_preference value of 1 is the most preferred location. Higher values identify fallback locations. The values must be non-zero, contiguous integers. Zones with the same preference can share leaders, while zones with no preference are least preferred.

Leader preference is not permanent pinning: The YugabyteDB load balancer attempts to place the leader in the most preferred available zone. During maintenance, failures, or topology changes, the leader can move to a fallback zone.
Step 6: Verify the Tablespaces

Query pg_tablespace:

				
					SELECT oid,
       spcname,
       spcoptions
FROM pg_tablespace
WHERE spcname IN (
    'customer_group_ts',
    'workflow_group_ts',
    'reference_group_ts'
)
ORDER BY spcname;


You should see one row for each tablespace.

The OIDs shown in this output will later correspond to the implicit tablegroups displayed in pg_yb_tablegroup.

Step 7: Create the Customer Colocation Group

Create a schema for the first logical group:

				
					CREATE SCHEMA customer;


Create two small, related tables in customer_group_ts:

				
					CREATE TABLE customer.customer_account (
    customer_id    BIGINT PRIMARY KEY,
    customer_name  TEXT NOT NULL,
    email_address  TEXT NOT NULL,
    created_at     TIMESTAMPTZ NOT NULL DEFAULT now()
)
TABLESPACE customer_group_ts;

CREATE TABLE customer.customer_preference (
    customer_id       BIGINT NOT NULL,
    preference_name   TEXT NOT NULL,
    preference_value  TEXT,
    PRIMARY KEY (customer_id, preference_name)
)
TABLESPACE customer_group_ts;


Create a secondary index in the same tablespace:

				
					CREATE INDEX customer_account_email_idx
ON customer.customer_account (email_address)
TABLESPACE customer_group_ts;
				
			
Step 8: Create the Workflow Colocation Group

Create a second schema:

				
					CREATE SCHEMA workflow;


Create related workflow tables in workflow_group_ts:

				
					CREATE TABLE workflow.workflow_type (
    workflow_type_id  INTEGER PRIMARY KEY,
    workflow_name     TEXT NOT NULL
)
TABLESPACE workflow_group_ts;

CREATE TABLE workflow.workflow_status (
    workflow_status_id  INTEGER PRIMARY KEY,
    status_name         TEXT NOT NULL,
    is_terminal         BOOLEAN NOT NULL DEFAULT false
)
TABLESPACE workflow_group_ts;


Create an index in the same tablespace:

				
					CREATE INDEX workflow_status_name_idx
ON workflow.workflow_status (status_name)
TABLESPACE workflow_group_ts;


These relations share a different colocation tablet from the relations in the customer schema.

Step 9: Create the Reference Colocation Group

Create the third schema:

				
					CREATE SCHEMA reference;


Create two small reference tables in reference_group_ts:

				
					CREATE TABLE reference.country_code (
    country_code  CHAR(2) PRIMARY KEY,
    country_name  TEXT NOT NULL
)
TABLESPACE reference_group_ts;

CREATE TABLE reference.currency_code (
    currency_code  CHAR(3) PRIMARY KEY,
    currency_name  TEXT NOT NULL
)
TABLESPACE reference_group_ts;


Create an index in the same tablespace:

				
					CREATE INDEX country_code_name_idx
ON reference.country_code (country_name)
TABLESPACE reference_group_ts;


These relations share the third colocation tablet.

YugabyteDB supports assigning colocated tables, indexes, and materialized views to tablespaces using the standard TABLESPACE clause.

Do not forget the indexes: Explicitly specify the intended tablespace when creating secondary indexes. This makes the desired grouping clear and ensures the index is assigned to the same tablespace-backed colocation group as its table.
Step 10: Create a Large Non-Colocated Table

Not every table should be placed into one of the colocation groups.

Large or write-intensive tables should usually remain non-colocated so they can use multiple tablets and scale independently.

Create a schema for larger historical data:

				
					CREATE SCHEMA history;


Create a non-colocated table with three initial tablets:

				
					CREATE TABLE history.event_history (
    event_id       UUID NOT NULL DEFAULT gen_random_uuid(),
    customer_id    BIGINT NOT NULL,
    event_type     TEXT NOT NULL,
    event_time     TIMESTAMPTZ NOT NULL DEFAULT now(),
    event_payload  JSONB,
    PRIMARY KEY (event_id HASH)
)
WITH (COLOCATION = false)
SPLIT INTO 3 TABLETS;


Create a distributed secondary index:

				
					CREATE INDEX event_history_customer_time_idx
ON history.event_history (
    customer_id HASH,
    event_time DESC
);


This table is not part of any colocation group. Its tablets and index tablets can distribute their leaders across the universe independently.

YugabyteDB recommends avoiding colocation for tables that receive disproportionately high loads. Tablet splitting is also disabled for colocated tables.

Step 11: Verify the Colocation Groups

Query pg_yb_tablegroup:

				
					SELECT tg.grpname,
       COALESCE(ts.spcname, 'pg_default') AS tablespace_name,
       tg.grptablespace AS tablespace_oid
FROM pg_yb_tablegroup AS tg
LEFT JOIN pg_tablespace AS ts
       ON ts.oid = tg.grptablespace
ORDER BY tablespace_name;


Example output:

				
					.     grpname      |   tablespace_name   | tablespace_oid
-------------------+---------------------+----------------
 default           | pg_default          |              0
 colocation_16410  | customer_group_ts   |          16410
 colocation_16411  | reference_group_ts  |          16411
 colocation_16412  | workflow_group_ts   |          16412
(4 rows)


The actual OIDs will be different in every database.

The important result is that there is a separate colocation_<oid> entry for each custom tablespace.

The grptablespace column contains the OID of the tablespace associated with that implicit tablegroup.

Why is there still a tablegroup catalog? The user-facing CREATE TABLEGROUP feature is deprecated, but YugabyteDB continues to use tablegroups internally. Tablespace-backed colocation automatically creates and manages these implicit tablegroups.
Step 12: Show the Tables in Each Group

The ysqlsh \dgrt meta-command lists the tables assigned to each tablegroup:

				
					\dgrt


Example output:

				
					.                   List of tablegroup tables
    Group Name    | Group Owner |          Name           | Type  |  Owner
------------------+-------------+-------------------------+-------+----------
 colocation_16410 | yugabyte    | customer_account        | table | yugabyte
 colocation_16410 | yugabyte    | customer_preference     | table | yugabyte
 colocation_16411 | yugabyte    | country_code            | table | yugabyte
 colocation_16411 | yugabyte    | currency_code           | table | yugabyte
 colocation_16412 | yugabyte    | workflow_type           | table | yugabyte
 colocation_16412 | yugabyte    | workflow_status         | table | yugabyte


The group names and OIDs will vary, but the output should show the tables divided among three separate groups.

The \dgrt output identifies which relations are colocated together. YugabyteDB’s documentation uses the same command to verify tablespace-backed implicit tablegroups.

Step 13: Verify the Tablespace Assigned to Each Table

Query the PostgreSQL catalogs:

				
					SELECT n.nspname AS schema_name,
       c.relname AS table_name,
       COALESCE(ts.spcname, 'pg_default') AS tablespace_name
FROM pg_class AS c
JOIN pg_namespace AS n
  ON n.oid = c.relnamespace
LEFT JOIN pg_tablespace AS ts
  ON ts.oid = c.reltablespace
WHERE c.relkind = 'r'
  AND n.nspname IN (
      'customer',
      'workflow',
      'reference',
      'history'
  )
ORDER BY n.nspname,
         c.relname;


Example output:

				
					.schema_name |       table_name        |   tablespace_name
-------------+-------------------------+---------------------
 customer    | customer_account        | customer_group_ts
 customer    | customer_preference     | customer_group_ts
 history     | event_history           | pg_default
 reference   | country_code            | reference_group_ts
 reference   | currency_code           | reference_group_ts
 workflow    | workflow_status         | workflow_group_ts
 workflow    | workflow_type           | workflow_group_ts
				
			
Step 14: Verify the Colocation Property

Describe one of the small tables:

				
					\d customer.customer_account


The output should include:

				
					Tablespace: "customer_group_ts"
Colocation: true


Describe the large table:

				
					\d history.event_history


Its output should show:.

				
					Colocation: false


You can also query yb_table_properties().

For a colocated table:

				
					SELECT is_colocated
FROM yb_table_properties(
    'customer.customer_account'::regclass
);


Expected result:

				
					.is_colocated
--------------
 t


For the non-colocated table:

				
					SELECT is_colocated
FROM yb_table_properties(
    'history.event_history'::regclass
);console.log( 'Code is Poetry' );


Expected result:

				
					.is_colocated
--------------
 f


The \d meta-command and yb_table_properties() function can both be used to verify whether a table is colocated.

Step 15: Verify Tablet Leader Placement

Use the YB-Master UI to inspect the parent colocation tablets.

Each tablespace-backed colocation group should have a separate parent colocation tablet. The parent table names use a format similar to:

				
					<tablegroup-object-id>.colocation.parent.tablename


Under stable conditions, the expected leader distribution is:

Tablespace Preferred Leader Zone Replica Placement
customer_group_ts zone1 zone1, zone2, zone3
workflow_group_ts zone2 zone1, zone2, zone3
reference_group_ts zone3 zone1, zone2, zone3

All three colocation tablets remain RF3. Each has one replica on each node, but their leaders can be distributed across the three nodes.

Leader preference allows YugabyteDB to place leaders in preferred zones when the system is stable and use fallback zones during outages or maintenance.

Does This Allow the Tables to Scale Independently?

The answer depends on what is meant by “scale independently.”

The three colocation groups can operate independently at the group level:

  • ● Each group has its own tablet.
  • ● Each group has its own tablet leader.
  • ● Each group can use a different leader preference.
  • ● Activity in one group does not have to pass through the leader of another group.
  • ● Related tables inside each group retain the benefits of colocation.

However, an individual colocation group is still backed by one tablet.

That means:

  • ● The group cannot split into multiple tablets.
  • ● Tables inside the group share the same tablet leader.
  • ● A single hot table inside the group cannot scale independently.
  • ● Adding nodes does not automatically split that group across more leaders.
Colocation versus horizontal scaling: Multiple tablespaces create multiple independently led colocation tablets. They do not turn one colocation group into a multi-tablet relation. A table that needs true horizontal write scalability should be created with COLOCATION = false.

How Should Tables Be Divided into Groups?

Do not simply divide the tables evenly by count.

Instead, group tables according to their workload and join relationships.

Good candidates for the same colocation group include:

  • ● Tables that are frequently joined.
  • ● Small lookup and configuration tables.
  • ● Tables owned by the same application component.
  • ● Tables with similar read and write patterns.
  • ● Tables that should share the same leader locality

Consider separate colocation groups when:

  • ● Two application areas rarely join each other.
  • ● One group receives more traffic than another.
  • ● Different workloads should prefer different leader zones.
  • ● Operational isolation between application components is useful.
  • ● One group is expected to grow faster than another.

Keep a table non-colocated when:

  • ● The table is large.
  • ● The table receives sustained high write throughput.
  • ● The table requires tablet splitting.
  • ● The table needs multiple tablet leaders for write scalability.
  • ● The table or its indexes would create a hotspot inside the group.

Joins Across Colocation Groups

Tables within the same group can benefit from local access because their data resides in the same parent tablet.

Tables in different colocation groups do not share the same tablet. A join between those tables may therefore require additional distributed reads or network communication.

For that reason, colocation groups should reflect real application relationships.

For example:

				
					Customer account
Customer preferences
Customer settings


These tables are reasonable candidates for one group because they are likely to be queried together.

A separate group might contain:

				
					Workflow types
Workflow states
Workflow transition rules


Small global reference tables could form another group:

				
					Country codes
Currency codes
Language codes


The goal is to balance:

  • ● Join locality.
  • ● Leader distribution.
  • ● Tablet overhead.
  • ● Workload isolation.
  • ● Future growth.

Moving Existing Colocated Tables

Colocated relations cannot be moved independently between tablespaces.

YugabyteDB requires the colocated relations in the group to be moved together. The destination tablespace must not already contain another set of colocated relations.

To move all relations from one tablespace to another:

				
					ALTER TABLE ALL IN TABLESPACE customer_group_ts
SET TABLESPACE new_customer_group_ts
CASCADE;
				
			
Plan the groups before loading production data: Tablespace-backed groups can be changed, but colocated relations generally move as a unit. It is easier to establish the intended workload boundaries before the tables become large or heavily used.

Backup and Restore Considerations

Tablespace information should be preserved when backing up and restoring a database that uses multiple colocation groups.

The YugabyteDB documentation shows that the colocation relationships can remain after a restore without tablespaces, but the restored implicit groups may all use the default tablespace instead of their original placement policies.

When using ysql_dump, include tablespace information when the original placement and group structure must be retained:

				
					ysql_dump \
  --host=<host> \
  --username=<username> \
  --dbname=application_db \
  --file=application_db.sql \
  --use_tablespaces


Review the backup and restore method used by your environment and confirm that tablespaces are recreated before restoring the tables assigned to them.

Monitoring Considerations

Metrics for colocated relations are generally associated with the parent colocation tablet rather than being completely isolated per table.

With one database-wide colocation tablet, all colocated relations appear under the same parent tablet.

With three tablespace-backed groups, there are three parent tablets. This provides better group-level visibility, although metrics are still not fully isolated for every individual table.

Avoid Creating Too Many Groups

Creating multiple groups does not mean that every small table should receive its own tablespace.

Each new group creates another colocation tablet, and that tablet has replicas according to the tablespace placement policy.

In an RF3 universe:

				
					1 colocation group  = 1 tablet × 3 replicas
3 colocation groups = 3 tablets × 3 replicas
10 colocation groups = 10 tablets × 3 replicas


The objective is to reduce tablet overhead while creating enough workload boundaries to prevent one tablet leader from becoming responsible for every small table in the database.

Recommended Design Pattern

For a database containing many small tables and several large tables, a balanced design could look like this:

Table Category Recommended Placement Reason
Related small tables Shared tablespace-backed colocation group Reduces tablet overhead and keeps related data together
Separate application area Different tablespace-backed colocation group Creates a separate tablet and leader
Large or write-heavy table COLOCATION = false Allows multiple tablets and horizontal scaling
Hot secondary index Index on a non-colocated table Avoids concentrating index writes in one colocation tablet

Final Takeaway

Explicit TABLEGROUP objects are no longer the preferred way to create multiple colocation groups in YugabyteDB.

For YugabyteDB 2025.2 and above, use the following pattern:

  • 1. Enable ysql_enable_colocated_tables_with_tablespaces on all YB-Masters and YB-TServers.
  • 2. Create the database with COLOCATION = true.
  • 3. Create one tablespace for each logical colocation group.
  • 4. Assign related small tables and indexes to the same tablespace.
  • 5. Use leader preferences to distribute the group leaders across zones.
  • 6. Create large or write-intensive tables with COLOCATION = false.
  • 7. Verify the implicit groups using pg_yb_tablegroup and \dgrt.

This design provides multiple independently led colocation tablets inside one database while preserving colocation benefits for related groups of small tables.

It does not make an individual colocation group horizontally scalable. Each group is still one tablet. Tables that need multiple tablets should remain non-colocated.

The simple rule: Use tablespaces to divide small, related tables into several independently led colocation groups. Use COLOCATION = false for tables that must scale across multiple tablets.

Related Documentation

Resource Description
Colocating Tables and Databases Explains colocated databases, colocated tables, implicit tablegroups, and how tablespaces can define separate colocation groups.
Geo-Placement with Tablespaces Documents replica placement policies, placement blocks, and leader_preference.
YB-Master Colocation Tablespace Flag Documents the YB-Master setting for ysql_enable_colocated_tables_with_tablespaces.
YB-TServer Colocation Tablespace Flag Documents the corresponding YB-TServer setting, which must also be enabled across the universe.
YugabyteDB Agent Skills Provides reusable YugabyteDB guidance and operational patterns for YSQL schema design, colocation, and distributed SQL workloads.

Have Fun!

My best friend and I are heading to the Nate Bargatze: Big Dumb Eyes World Tour tonight at PPG Paints Arena in Pittsburgh!

The last stand-up comedian we saw together was Nikki Glaser at a much smaller venue… and I ended up getting COVID afterward. 😂

Hopefully Nate’s show is a little healthier for me!